The Save Presets feature enables advanced automatic document storage management. This allows PDFScanner to automatically determine the destination directory for the current scan. The feature itself is quite simple, but it enables a number of workflows that weren't possible before with PDFScanner.
Please note that Save Presets are a feature of the "Pro-Mode" In App Purchase.
This help article will first explain how to configure Save Presets and then go on to show how these can be used in differenct document storage workflows.
You can define Save Presets in the Preferences on the Save Presets Tab:
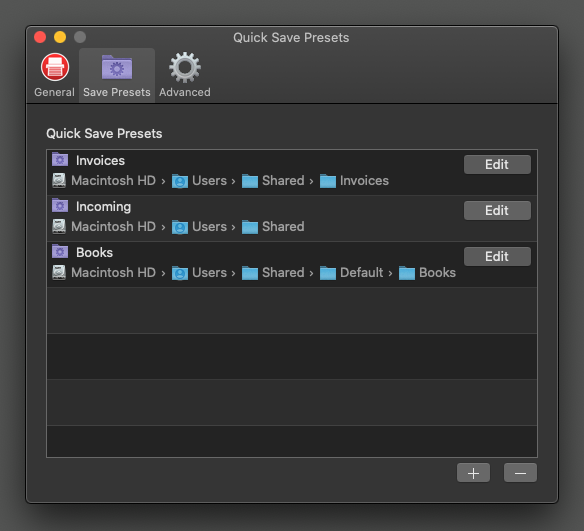
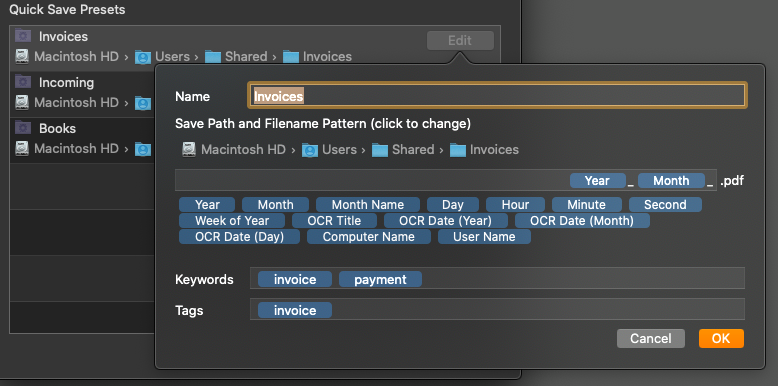
Save Presets can be added and removed via the + and - buttons on the lower right corner of the window. They can be reordered via drag-and-drop. When creating a new preset, you need to enter a name that identifies it. There are several other configuration options that belong to the preset:
- the folder in which documents are stored
- the file name pattern (just like on the main preference page of PDFScanner)
- an optional set of keywords. If you enter keywords, the OCR'd documents will be checked if they contain at least one of those keywords and if they do, be stored accoring to this preset. Refer to the workflows below to see how this can be used in practice
- tags to attach to the saved files. This is useful if you use the macOS Finder Tags feature to mark your documents (optional).
If you have created one or more presets, you can use them to implement a number of workflows that automate a lot of the manual work around saving documents to disk. To clarify this, four different workflows that use save presets are presented here:
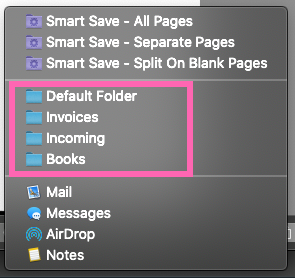
Quick Folder Selection
The simplest use case is to skip the save dialog the normally opens when clicking on "Save" or "Save Selection" and make PDFScanner store the file directly to the specified folder. To directly save a document according to a save preset, click on the small share icon besides the "Save" or "Save Selection" button (depending on whether you wish to save all pages or just the currently selected subset) and select one of the defined presets. Even if no presets has been created, there will always be the default options from the main preference page of PDFScanner to be used as the "Default Folder", so you can at least skip the Save Dialog and let PDFScanner define the file name automatically.
If a file matching the filename pattern already exists in that folder, a numer will be appended (by default to the end of the file). To control where the number is added, you can use the "#", "##" and "###" placeholders in the filename pattern settings.

Smart Save Document
Smart Save uses the text inside the document (usually detected by OCR) and the keywords defined on the save presets to automatically determine which preset to use and store the document accordingly.
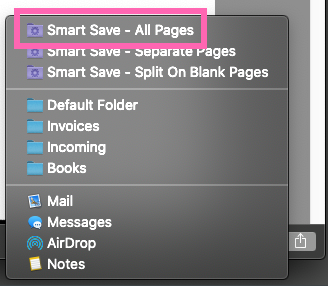
Selecting "Smart Save - All Pages" will look through all presets and try to find one of the defined keywords inside the document. If it is found, the preset is applied and the document is saved according to the preset configuration. The order in which the presets are listed in the preferences also defines the order in which keywords are checked when automatically determining which preset to apply. If none of the presets matches, the default save folder and file pattern (from the main preferences page of PDFScanner) will be used.
You can use this method to fully let PDFScanner determine where to store the document. To indicate where the file has been stored, a notification will pop up. If you click on it, the location will be opened in the Finder.

Smart Save Single Pages
You can use the "Smart Save - Separate Pages" to run Smart Save independently for each of the pages of the document (or the current slection, if you use the icon on the "Save Selection" button).
All other behavior is exactly like explained above, so each document will be saved to the folder and with the file name pattern defined in the matched preset.
Of course, you can also use this feature without defining any presets (or keywords). In that case, all documents will simply be saved to the default save directory.
Smart Save Multiple Documents
The most advanced feature can be employed by users that often have to scan many multi page documents at once. The "Smart Save - Split On Blank Pages" feature will behave like the single page one, but not split after each page but just when it detects a blank page. That page will then be removed and the next document starts.
This allows you to put empty pages in your stack of paper when scanning to indicate where documents should be split.